Shabrina Kharismasari 5112100072
A. Heynoum Dala Rifat 5112100084
We would like to show you how to use TC Welcome. TC Welcome is a simple mobile application built using iBuildApp (http://ibuildapp.com), iBuildApp is an online service that provides a simple and inexpensive way to build, test, rss feeds, images, audio, video, and much, much more. You can create your mobile app for free, but to upload it to google store you have to pay (but no need to worry if you only want to see your app on your mobile phone, iBuildApp has a feature where they can send you the link of your app to your mobile, and you can simply download it!)
Before we explained how to use TC Welcome, let us give you a brief explanation of how to use iBuildApp. It is actually very easy, like Pak Fajar said on class two weeks ago, people can now make their own mobile app within 5 minutes (well 5 minutes will be not so good, but still it's 5 minutes...).
So the step by step (will be explained with Indonesian + English), do not confused!
- Go to the website (http://buildapp.com), and you will be directed to the home screen

- If you don't have any account, simply click register on top right of the screen. If you have, just hit the login button. It is very easy to register or login (to make it easier you can just connect iBuildApp with your facebook)

- Now you can choose the template for your mobile app. Because the theme of the assignment was "education", we chose the School and Universities theme and select the free one (sadly no money to purchase one)

- If you click one of the template, you can review it, and if you like it, you can make using the template by clicking the "create app" button

- To see "home" page on the template that we've chosen, press the "home" menu on the application preview section. (Untuk melihat halaman home pada template yang telah kami pilih, tekan menu home pada bagian preview aplikasi.)
- To delete, move the pointer to one of the menu that you wanted to delete, and the delete option will show up. To add a feature, simply click "add feature" then choose the menu that you want. There are plenty of options available, but you can only choose up to 12 feature for the whole application. (Untuk menghapus, arahakan pointer ke salah satu menu yang ingin dihapus dan akan muncul pilihan delete. Untuk menambah aplikasi klik Add Feature lalu pilih menu yang diinginkan. Tetapi, untuk template ini maksimal terdapat 12 menu.)

- The pictures below are the design menu. The function of this menu is to modify background, splashscreen, color scheme, the name of the menus, and application tittle. By the way the pictures are limited so if you don't find any matching background or/and splashscreen you can simple upload your desire picture. (Gambar di bawah adalah menu Design yang berguna untuk memodifikasi Background, Splashscreen, Color Scheme, nama-nama menu yang ada dan judul aplikasi yang berada dibagian atas yang berupa gambar.)

- Next, we'll tell you how to modify the features :) You may notice some feature has the same supporting app :)
- About us
About is a HTML/JS menu. In this menu, you can change the menu name, menu logo, menu background, and you can add text and pictures.
(Menu about us merupakan menu berbentuk
HTML/JS. Pada menu ini dapat diubah nama menu, logo menu, background tampilan
menu ini dan isinya adalah berupa tulisan dan gambar.)
- Comments
Comment is Powr menu, which (well obviously from the name) you can write comments. But please be polite!!
(Menu Komentar adalah menu
berupa Powr, yaitu berupa komentar.)
- Staffs and Lessons
Staff and Lessons menu are Catalog Show. This catalog show is a bit complicated at the beginning (well, based on my exprience). It is actually quite funny because staff and lessons are not catalog, but since it is the best feature to add list, we use them. To add category, move the pointer to one of the category and click "add subcategory". To add an item, move the pointer to one of the item and choose "add item".
(Menu Staff dan Lessons adalah menu berupa
Catalog Show yang dapat ditambah isi catalognya. Untuk menambah category,
arahkan pointer kearah salah satu category lalu pilih Add Subcategory. Untuk
menambahkan item, arahkan pointer kearah salah satu item lalu pilih add item.)
- Web
Web is.. obviously web. To change the destionaion, simply change the website's URL. Pretty, easy right?
Menu web adalah menu berupa web, cara
menggantinya adalah dengan mengganti website URL.
- Events
In events, you can add events. To add, simply click add and the box below will show up. Too bad you can only choose a date, but not the range of date.
Menu events adalah menu berupa events,
untuk menambahnya, dapat diklik tombol Add.
Facebook menu is a menu that connects the app to the facebook. It is pretty easy to change the facebook direction, just type in the facebook username. But to like the page, you need to login first to facebook. But remember, this is not the facebook app, it can only show you one page.
Menu Facebook adalah menu yang menampilkan
halaman Facebook, untuk menggantinya dapat dilakukan dengan mengganti Facebook
Usernamenya.
Twitter menu is almost the same with twitter. To change the destination, just change the twitter username.
Menu twitter adalah menu yang menampilkan
halaman twitter, untuk menggantinya dapat dilakukan dengan mengganti Twitter
Usernamenya.
- Contact
Last menu (but not least), contact! It shows some information from Informatics department. Just click the add button to add. Too bad we can't customize the page (for example, we can't add another information)
Menu Contacts menampilkan
beberapa informasi dari Teknik Informatika. Untuk
menambahnya, klik tombol Add.
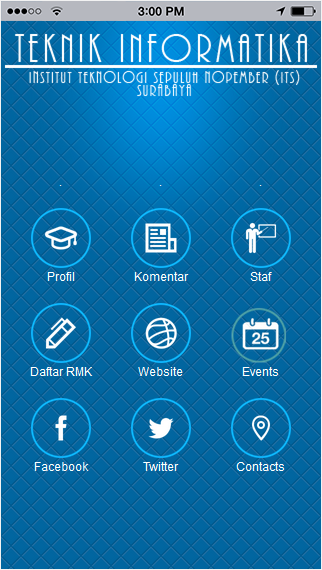
TC Welcome is an application to show people (mostly those who are interested to learn at the Informatics department, Sepuluh Nopember Institute of Technology) general things inside Informatics department e.g. department's profile, contacts, lecturer list, labs, etc.
 |
| we welcome you to TC welcome! (it is not welcomeception!) |
In this post we would like to show you how to use it. It is basically so simple: just click, and browse! It is easier to use this application rather than open the website, since it is the simplification of the website (but you can also access the website through the app!)
The features are:
- Profile
In this feature, you can see the profile of our beloved Informatics department, from vision and mission, history, and organization structure.
- Comments
Any comments about our department? Do not hesitate to leave us a comment. It is easy. Just type what you want in the box, and the hit the submit button. This feature is supported using Powr.
- Staff list
Staff list show you.. the list of staffs. You can browse and look the academic and administration staffs within this feature. The academic staffs are divided based on their specialization, and the administration staffs are divided based on their work.
If you click the specific staff/lecturer you want to see, it will show you their research field and their position (if any). And look, there is a like button! But you need to login to your facebook first.
- Clump courses (RMK) list
The clump courses (I need to be honest I used google translate to translate RMK to English. Geesh, I don't even know if "clump courses" are the right words). This list show you about the specialization fields at our departments. When you click one, it will show the list of the courses that are on that specialization, e.g if you click RPL (Software Engineering), it will show you the picture beside!
- Website
Like we mentioned on some paragraph above, you can browse the website through this app! No need to search in google for the link, it will direct you.
- Events
In the events section, it will show you the events of our departments. And if you click on speficif events, it will show you the information.
If you want to know more about news and the student activity, our student association's facebook is one of the answer. You can click the facebook icon and it will direct you to our page. But first, do not forget to like our student associaton's page!
Almost the same feature with facebook, but it will show you our student's association tweet (if you like twitter more). Don't forget to follow!
- Contacts
Last but not least, and also one of the most important information, contacts! Here you can see the telephone number and the address of our department in case you want to visit and take selfie in front of our beautiful building :)
So those above are the features of TC Welcome. In the future, there are possibility to add some more feature for example gallery, and information about labs.
iBuildApp has advantages and disadvantages. The advantages, you can build your mobile app without any code, so that would be easy for peole who has zero experience in coding. The disadvantages, you can only has up to 12 features, no more. And it is extremely time-consuming to rearring the layout of the icons. And you have to pay to upload it to google store (well, but basically every app has to).
So that is our simple tutorial about our TC Welcome. Do not hesistate to leave a comment if you have any question or if you just want to simply say hi!
Thanks for reading!
Dala & Arin.
note:
-All pictures of lecturers are taken from the website
-Screenshots are made using Asus Zenfone6


Wow that looks helpfull for new student in TC :)
BalasHapus